1. create 기능(글 추가 기능)
create버튼을 클릭했을 때 글을 작성하는 화면이 나오도록 구현해보자.
main.html
<!DOCTYPE html>
<html>
    <head>
        <!--redux를 웹페이지에 로딩-->
        <script src="https://cdnjs.cloudflare.com/ajax/libs/redux/4.2.0/redux.js"></script>
    </head>

    <body>
        <div id="subject"></div>
        <div id="toc"></div>
        <div id="control"></div>
        <div id="content"></div>
        <script>

    function subject(){
        document.querySelector('#subject').innerHTML = `
        <header>
            <h1>WEB</h1>
            Hello, WEB!
        </header>
        `
    }

    function TOC(){
        var state = store.getState();
        var i = 0;
        var liTags = '';

        while(i < state.contents.length){
            liTags = liTags + `
                <li>
                    <a onclick="
                        event.preventDefault(); <!--event가 발생했을 때 event를 발생시킨 태그의 기본 동작을 방지-->
                        var action = {type: 'SELECT', id:${state.contents[i].id}} //type은 action에서 필수적
                        store.dispatch(action); //dispatch로 action정보가 넘어감. 그리고 reducer 호출됨
                    "href="${state.contents[i].id}">
                        ${state.contents[i].title}
                    </a>
                </li>`;
            i = i + 1;
        }

        document.querySelector('#toc').innerHTML = `
        <nav>
            <ol>${liTags}</ol>
        </nav>
        `;
    }

    function control(){
        document.querySelector('#control').innerHTML = `
        <ul>
            <li><a onclick="
                event.preventDefaualt();

            " href="/create">create</a></li>
            <li><input type="button" value="delete"></li>
        </ul>
        `;
    }

    function article(){
        var state = store.getState();
        if(state.mode === 'create'){
            document.querySelector('#content').innerHTML = `
            <article>
                <form onsubmit="
                    event.preventDefault();
                    <!--form 안에 있는 name값이 title인 태그인 값 가져오기-->
                    var _title = this.title.value; <!--title에 입력한 값-->
                    var _desc = this.desc.value; <!--desc에 입력한 값-->
                    store.dispatch({ <!--dispatch가 실행되면서 reducer가 호출되면서 매개변수 action으로 값이 들어감-->
                        type:'CREATE',
                        title:_title,
                        desc:_desc
                    })
                ">
                    <p>
                        <!--placeholder는 아무 것도 입력하지 않을 때 나오는 도움말-->
                        <input type="text" name="title" placeholder="title">
                    </p>
                    <p>
                        <textarea name="desc"
                        placeholder="description"></textarea>
                    </p>
                    <p>
                        <input type="submit", value="submit">
                    </p>
                </form>
            </article>
            `
        }else if(state.mode === 'read'){
            var i = 0;
            var aTitle, aDesc;

            while(i < state.contents.length){

                if(state.contents[i].id === state.selected_id){
                    aTitle = state.contents[i].title;
                    aDesc = state.contents[i].desc;
                    break;
                }

                i = i + 1;
            }
            document.querySelector('#content').innerHTML = `
            <article>
                <h2>${aTitle}</h2>
                ${aDesc}
            </article>
            `
        }

    }

    function reducer(state, action){ //이전의 상태 값과 호출된 이후의 action 값을 받는다.

        if(state === undefined){ //초기값 셋팅
            return{
                max_id:2,
                mode:'create', //글을 쓸 수 있는 형태 (read는 글을 읽을 수 있는 형태)
                selected_id:2,
                contents:[
                    {id:1, title:'HTML', desc:'HTML is ...'},
                    {id:2, title:'CSS', desc: 'CSS is ...'}
                ]
            }
        }

        var newState;
        if(action.type === 'SELECT'){
            newState = Object.assign({}, state, {selected_id:action.id});
            //state의 속성값이 빈객체에 복제되고, 그것이 newState가 된다.
            //즉, newState는 기존의 값인 state에 selected_id값이 덮어쓰기 된 값이 된다.
        } else if(action.type === 'CREATE'){
            var newMaxId = state.max_id + 1;
            var newContents = state.contents.concat(); //contents는 배열이기 때문에 배열을 복제할 때는 concat을 사용하여 복제
            newContents.push({id:newMaxId, title:action.title, desc:action.desc}) //새로운 내용이 추가된 배열
            newState = Object.assign({}, state, {
                max_id:newMaxId,
                contents:newContents,
                mode:'read' //글을 작성하는 것이 끝나 create모드에서 read모드로 변환
            })
        }

        console.log(action, state, newState);
        return newState;
    }

    var store = Redux.createStore(reducer); //store생성
    //subscribe는 값이 바뀌면 함수를 자동으로 호출함
    store.subscribe(article);
    store.subscribe(TOC);
    subject();
    TOC();
    control();
    article();
        </script>
    </body>
</html>
결과화면
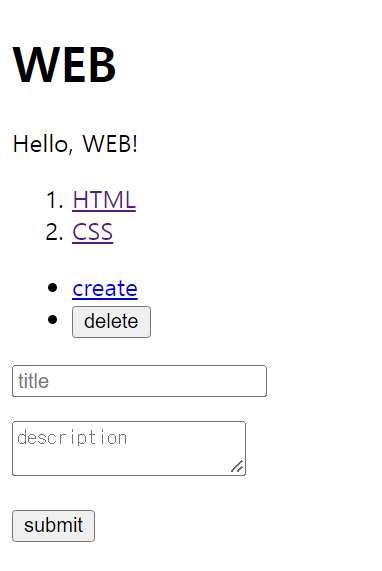

새로운 글을 추가하는 create하는 기능이 잘 구현된 것을 확인할 수 있다.
강의영상 - https://youtu.be/Ah_-BUs4uW8
2. deletee 기능(글 삭제 기능)
main.html
<!DOCTYPE html>
<html>
    <head>
        <!--redux를 웹페이지에 로딩-->
        <script src="https://cdnjs.cloudflare.com/ajax/libs/redux/4.2.0/redux.js"></script>
    </head>

    <body>
        <div id="subject"></div>
        <div id="toc"></div>
        <div id="control"></div>
        <div id="content"></div>
        <script>

    function subject(){
        document.querySelector('#subject').innerHTML = `
        <header>
            <h1>WEB</h1>
            Hello, WEB!
        </header>
        `
    }

    function TOC(){
        var state = store.getState();
        var i = 0;
        var liTags = '';

        while(i < state.contents.length){
            liTags = liTags + `
                <li>
                    <a onclick="
                        event.preventDefault(); <!--event가 발생했을 때 event를 발생시킨 태그의 기본 동작을 방지-->
                        var action = {type: 'SELECT', id:${state.contents[i].id}} //type은 action에서 필수적
                        store.dispatch(action); //dispatch로 action정보가 넘어감. 그리고 reducer 호출됨
                    "href="${state.contents[i].id}">
                        ${state.contents[i].title}
                    </a>
                </li>`;
            i = i + 1;
        }

        document.querySelector('#toc').innerHTML = `
        <nav>
            <ol>${liTags}</ol>
        </nav>
        `;
    }

    function control(){
        document.querySelector('#control').innerHTML = `
        <ul>
            <li><a onclick="
                event.preventDefaualt();
                store.dispatch({
                    type:'CHANGE_MODE',
                    mode:'create'
                })
            " href="/create">create</a></li>
            <li><input onclick="
                store.dispatch({
                    type:'DELETE'
                    <!--삭제 기능은 특정 토픽이 선택된 상태에서 하기 때문에-->
                    <!--store의 state값이 seleted_id로 셋팅되어 있어 id값이 별도 지정 필요 없음-->

                });
            " type="button" value="delete"></li>
        </ul>
        `;
    }

    function article(){
        var state = store.getState();
        if(state.mode === 'create'){
            document.querySelector('#content').innerHTML = `
            <article>
                <form onsubmit="
                    event.preventDefault();
                    <!--form 안에 있는 name값이 title인 태그인 값 가져오기-->
                    var _title = this.title.value; <!--title에 입력한 값-->
                    var _desc = this.desc.value; <!--desc에 입력한 값-->
                    store.dispatch({ <!--dispatch가 실행되면서 reducer가 호출되면서 매개변수 action으로 값이 들어감-->
                        type:'CREATE',
                        title:_title,
                        desc:_desc
                    })
                ">
                    <p>
                        <!--placeholder는 아무 것도 입력하지 않을 때 나오는 도움말-->
                        <input type="text" name="title" placeholder="title">
                    </p>
                    <p>
                        <textarea name="desc"
                        placeholder="description"></textarea>
                    </p>
                    <p>
                        <input type="submit", value="submit">
                    </p>
                </form>
            </article>
            `
        }else if(state.mode === 'read'){
            var i = 0;
            var aTitle, aDesc;

            while(i < state.contents.length){

                if(state.contents[i].id === state.selected_id){
                    aTitle = state.contents[i].title;
                    aDesc = state.contents[i].desc;
                    break;
                }

                i = i + 1;
            }
            document.querySelector('#content').innerHTML = `
            <article>
                <h2>${aTitle}</h2>
                ${aDesc}
            </article>
            `
        } else if(state.mode === 'welcome'){
            document.querySelector('#content').innerHTML = `
            <article>
                <h2>Welcome</h2>
                Hello, Redux!!!
            </article>
            `
        }

    }

    function reducer(state, action){ //이전의 상태 값과 호출된 이후의 action 값을 받는다.

        if(state === undefined){ //초기값 셋팅
            return{
                max_id:2,
                mode:'welcome', //글을 쓸 수 있는 형태 (read는 글을 읽을 수 있는 형태)
                selected_id:2,
                contents:[
                    {id:1, title:'HTML', desc:'HTML is ...'},
                    {id:2, title:'CSS', desc: 'CSS is ...'}
                ]
            }
        }

        var newState;
        if(action.type === 'SELECT'){
            newState = Object.assign(
                {},
                state,
                {selected_id:action.id, mode:'read'});
            //state의 속성값이 빈객체에 복제되고, 그것이 newState가 된다.
            //즉, newState는 기존의 값인 state에 selected_id값이 덮어쓰기 된 값이 된다.
        } else if(action.type === 'CREATE'){
            var newMaxId = state.max_id + 1;
            var newContents = state.contents.concat(); //contents는 배열이기 때문에 배열을 복제할 때는 concat을 사용하여 복제
            newContents.push({id:newMaxId, title:action.title, desc:action.desc}) //새로운 내용이 추가된 배열
            newState = Object.assign({}, state, {
                max_id:newMaxId,
                contents:newContents,
                mode:'read' //글을 작성하는 것이 끝나 create모드에서 read모드로 변환
            })
        } else if(action.type === 'DELETE'){
            var newContents = [];
            var i = 0;
            while(i < state.contents.length){
                if(state.selected_id !== state.contents[i].id){

                    newContents.push(
                        state.contents[i]
                    );
                }
                i = i + 1;
            }
            newState = Object.assign({}, state, {
                contents:newContents,
                mode:'welcome'
            })
        }else if(action.type === 'CHANGE_MODE'){
            newState = Object.assign({}, state, {
                mode:action.mode
            });
        }

        console.log(action, state, newState);
        return newState;
    }

    var store = Redux.createStore(reducer); //store생성
    //subscribe는 값이 바뀌면 함수를 자동으로 호출함
    store.subscribe(article);
    store.subscribe(TOC);
    subject();
    TOC();
    control();
    article();
        </script>
    </body>
</html>
결과화면
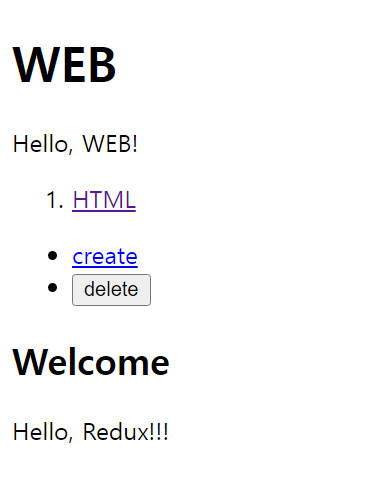
CSS를 클릭하교 delete 버튼을 눌렀을 때 잘 삭제되는 것을 확인할 수 있다.
강의영상 - https://youtu.be/2s6s4IHzGSs
'🌐 Web > Redux' 카테고리의 다른 글
| 08. 웹페이지 만들기(2) (0) | 2022.09.14 |
|---|---|
| 07. 웹페이지 만들기(1) (0) | 2022.09.08 |
| 06. Redux의 장점 : 시간여행 (0) | 2022.09.06 |
| 05. Redux를 이용한 애플리케이션 : state의 변화를 UI에 반영 (0) | 2022.09.06 |
| 04. Redux를 이용한 애플리케이션 : reducer와 action을 이용해서 새로운 state 값 만들기 (0) | 2022.09.03 |